
Quick start
This page uses the built-in demo Task to walk through installation, service connection, asynchronous submission, waiting, and artifact inspection. Demo only adds two integers and requires no Tushare, DingTalk, or model credentials.
Install
AxonX requires Python 3.12 or later. The local TaskManager supports macOS and Linux. Create a virtual environment:
python -m venv .venv
source .venv/bin/activate
pip install axonx
axonx help
For the prebuilt browser UI, use pip install "axonx[studio]". Development tools are available through axonx[dev]; axonx[full] includes both.
Install from source
Requires Node.js 22.13+ (22.x), 24.x, or 26+ to build Studio:
git clone https://github.com/FlowLLM-AI/AxonX.git
cd AxonX
pip install -e .
cd axonx_studio
npm ci && npm run build
cd ..
pip install ./axonx_studio
Activate your virtual environment before installing. This installs the core from source and builds and installs Studio locally. For frontend changes, see Studio development; for development dependencies, see Contributing.
Research plugins are installed separately; see Research workflow.
Configure and start the service
Set your own service token in terminal A, then start the service:
export AXONX_SERVICE_TOKEN='replace-with-your-local-service-token'
axonx start --service.host 127.0.0.1
The default port is 1024, the workspace is .axonx under the current directory, and the log directory is logs. Keep the service running and execute the following calls in terminal B. Activate the same Python environment in terminal B and set the same token as the service:
source .venv/bin/activate
export AXONX_SERVICE_TOKEN='replace-with-your-local-service-token'
axonx version
Expect a JobResponse with success: true. Default Jobs require authentication; without a configured service token, they do not appear in the public catalog. See Authentication and permission boundaries for the full rules.
Check health and the public catalog:
curl -sS http://127.0.0.1:1024/health \
  -H "Authorization: Bearer $AXONX_SERVICE_TOKEN"
curl -sS http://127.0.0.1:1024/jobs \
  -H "Authorization: Bearer $AXONX_SERVICE_TOKEN"
/health should return answer.running: true. /jobs describes the Jobs exposed by this service. Query the Task definition in the next step.
If the port is occupied, change the startup command to axonx start --service.host 127.0.0.1 --service.port 8181. Append --target 127.0.0.1:8181 --token "$AXONX_SERVICE_TOKEN" to client commands, and update curl URLs to use 8181 as well.
Discover and submit Demo
View Demo's description and input/output Schema:
axonx get_task_definition --task demoThe required inputs are x and y; fail defaults to false. Use an explicit instance name for your first submission so it is easy to find:
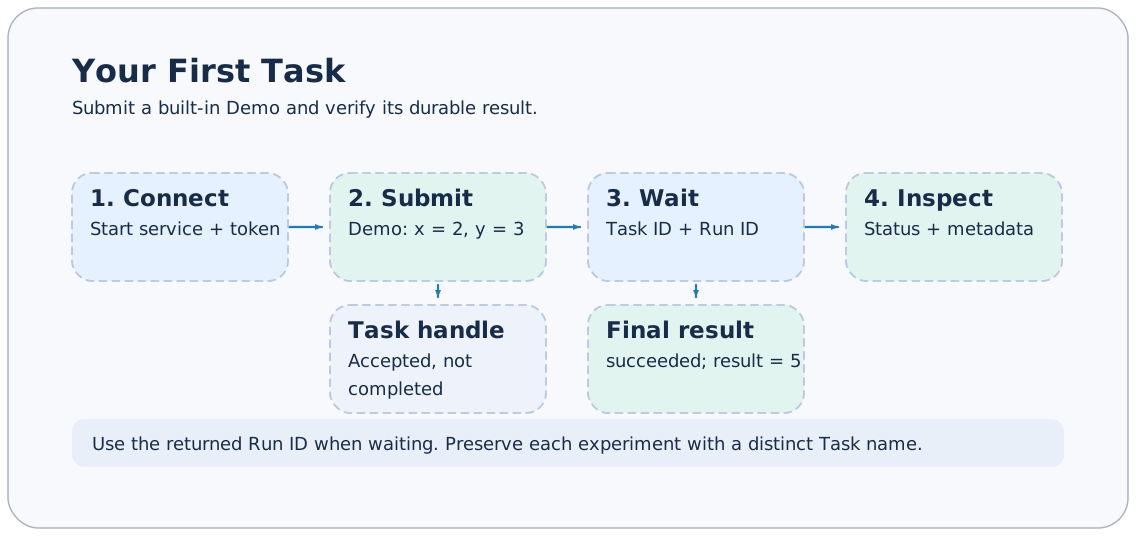
axonx submit --task demo --task-name first-demo --x 2 --y 3Example expected response:
{
  "answer": {
    "task_id": "base#demo#first-demo",
    "run_id": "<run identifier returned by this call>",
    "task": "demo"
  },
  "success": true,
  "metadata": {}
}
Keep the actual returned run_id. success: true means the submission was accepted; you still need to check the Task's final state.
Wait and inspect results
Replace the run identifier with the actual value from the previous step:
axonx wait_task --task-id 'base#demo#first-demo' \
  --run-id '<actual returned run_id>' --client-timeout 120
axonx status --task-id 'base#demo#first-demo'
axonx read_task_log --task-id 'base#demo#first-demo'
The final state should be succeeded, and result.result should be 5. wait_task checks both Task ID and run_id to avoid waiting for another execution that reruns the same name.
You can also follow progress and logs while the task is running:
axonx stream_task --task-id 'base#demo#first-demo' --stream trueDemo finishes quickly, so the follow command may immediately read its final state. For long tasks, adjust --client-timeout to the expected duration; this is the client request timeout, not the Task execution time limit.
Inspect persistent records
A successful task directory contains status.json, events.jsonl, and metadata.json:
.axonx/
  base/
    base#demo#first-demo/
      status.json
      events.jsonl
      metadata.json
Read metadata through the workspace API:
axonx preview_file --path 'base/base#demo#first-demo/metadata.json'In metadata.json, input_params records parameters and output_params.result is 5. Demo produces no additional data files, so an empty artifacts is normal. Paths are relative to the service's workspace; run logs are located through the status's log_path in the separately configured log directory.
Execute in the current process
If you do not need a persistent service, execute with a different instance name:
axonx exec --task demo --task-name direct-demo --x 2 --y 3The command prints the Task output directly when it completes. exec and submit have different execution entry points, but share Task input/output and persistent record formats.
A fixed task_name is not an immutable version number: executing the same registered name and instance name again replaces a completed task directory; an active task cannot be overwritten by a submission with the same name. To retain multiple experiments, use different names or omit task_name so the framework generates one. See Task identity and lifecycle.
Next steps
- Use Studio to submit and inspect tasks in the same workspace in a browser.
- Follow the Quantitative research workflow to install research plugins and prepare data.
- Consult the complete CLI parameters, Server configuration, and Task API.
For startup failures, authentication failures, or missing artifacts, see FAQ and Log troubleshooting.